在不同时期不同业务场景下,前端对框架的选择也不近相同,本文将会分享PC文章页中的评论系统的开发过程,如何在传统业务中使用 vue 重构(开发)一个业务组件,这与直接使用 vue 开发页面有什么不同,同时也会顺便介绍下 vue-cli 3.0 版本的新增的一些功能对开发独立组件/库带来的便利。
问题分析:
vue 组件以何种方式在 jQuery 框架下运行。
组件与页面其他功能之间如何通信。
使用 vue 组件是否会带来加载数据量的提升,如何解决。
vue 组件是如何挂载到 jQuery 页面中的 如下面代码,提供一个id作为挂载点,vue将组件直接渲染到 app 对应的div上,下面我们将介绍下具体是如何操作的。
1 2 3 4 5 6 7 8 <div id ="app" > </div > <script src ="https://cdn.bootcss.com/vue/2.5.15/vue.min.js" > </script > <script src ="https://cdn.bootcss.com/vuex/3.0.1/vuex.min.js" > </script > <script src ="./commentSystem.umd.min.js" > </script > <script > new Vue({render: h => h(window ["commentSystem" ])}).$mount('#app' ); </script >
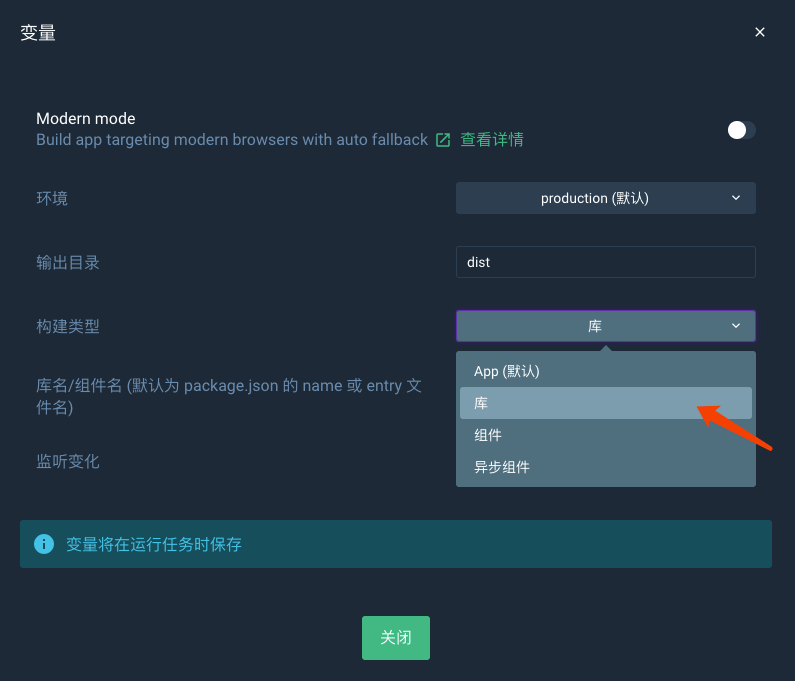
vue-cli 3.0 提供了构建目标 的选项,可以将一个组件打包成一个UMD格式的库对外暴漏。
运行:1 vue-cli-service build --target lib --name myLib [entry]
结果:1 2 3 4 5 6 File Size Gzipped dist/myLib.umd .min .js 13.28 kb 8.42 kb dist/myLib.umd .js 20.95 kb 10.22 kb dist/myLib.common .js 20.57 kb 10.09 kb dist/myLib.css 0.33 kb 0.23 kb
也可以使用 vue ui 提供的图形界面完成打包:
vue-cli 3.0 提供的构建目标的功能非常实用,在 2.0 版本时我们如果想发布一个组件需要自己手动修改 webpack 配置。对这部分有兴趣的可以移步如何在 npm 上发布你的 vue 组件
组件内部通信 vuex 状态管理。 在评论模块中,组件需要和其他组件的交互状态,通过 props 和 emit 传递状态过于繁琐,引入状态管理必不可少。
1 2 3 4 5 6 7 8 9 import Vue from 'vue' ;import Vuex, { mapState } from 'vuex' ;Vue.use(Vuex); export default { name: 'CommentSystemComponent' , store: store }
官方示例把 store 引入在 app.vue 中,因为我们打包的根节点在 CommentSystem.vue 组件上,所以 store 在 CommentSystem.vue 中引入。
组件与页面其他功能之间如何通信。
配置参数传入。
1 2 3 4 5 6 7 8 9 10 11 12 13 14 15 <script > window .ahCSConfig = { _appid: 'cms' , appid: 1 , contentid: 595293 , reply: { tips: '汽车之家温馨提示您:留言中请不要恶意攻击国家、其他用户及工作人员,不要发布任何广告性质的留言,我们会在第一时间永久封杀违反以上规定的ID。流畅沟通、观点鲜明、善意提醒是我们推崇的良性留言氛围。' , }, comment: { tips: '留言中所有与交易和团购相关的信息均为虚假信息,与汽车之家无关,请勿相信。' } } </script > <script src ="./dist/comment-system.umd.min.js" > </script >
通过全局变量传入配置参数,注意脚本顺序。
页面向组件发送消息。
1 2 3 4 5 6 7 8 9 10 var rootComponent = new Vue({ render: h => h(window ["comment-system" ]) }).$mount('#app' ); ahCSConfig.$comment = rootComponent.$children[0 ].$children[0 ]; document .querySelector('#btn' ).addEventListener('click' , function ( ahCSConfig.$comment.$store.commit('SET_PICTURE_DIALOG_DATA' , { visible: true , info: 'http://www3.autoimg.cn/newsdfs/g24/M02/26/26/80x0_0_autohomecar__ChcCL1p5uC-AFrOcABBbFVoFSGA574.jpg' }); }, false );
页面向组件通信,通过获取组件对象并commit相关消息来实现。
组件向页面发送消息。
1 2 3 4 event: ({type, payload}) => { console .log('组件对外暴漏commit方法' , type, payload); }
1 2 3 4 5 6 7 8 9 10 11 12 const ahCSConfig = window .ahCSConfig;const eventInterceptors = store => { store.subscribe((mutation, state) => { ahCSConfig && ahCSConfig.event && ahCSConfig.event(mutation); }); }; export default new Vuex.Store({ plugins: [eventInterceptors] })
通过配置项中添加 event 方法,vue组件内每次 commit 都会调用 event 方法并传入 type 和 payload。
关于使用外部组件的探讨(element-ui) 在评论系统中会用大 Dialog、Message、Button、Pagination 等组件。这些组件我们可以选择一个UI库引入,也可以自行开发。
element-ui 支持按需引入:
借助 babel-plugin-component,我们可以只引入需要的组件,以达到减小项目体积的目的。
首先,安装 babel-plugin-component:
1 npm install babel-plugin -component -D
然后,将 .babelrc 修改为:
1 2 3 4 5 6 7 8 9 10 11 12 { "presets" : [["es2015" , { "modules" : false }]], "plugins" : [ [ "component" , { "libraryName" : "element-ui" , "styleLibraryName" : "theme-chalk" } ] ] }
接下来,如果你只希望引入部分组件,比如 Button 和 Select,那么需要在 main.js 中写入以下内容:
1 2 3 4 5 6 7 8 9 10 11 12 13 14 15 import Vue from 'vue' ;import { Button, Select } from 'element-ui' ;import App from './App.vue' ;Vue.component(Button.name, Button); Vue.component(Select.name, Select); * Vue.use(Button) * Vue.use(Select) */ new Vue({ el: '#app' , render: h => h(App) });
在评论系统中,借鉴了 element 的源码,自行实现了这几个组件。
扩展 axios 支持 jsonp axios 官方对跨域推荐的解决方式是设置CORS,在我们的业务中很多接口无法设置CORS,所以需要引入jsonp包解决这个问题,对此我们提供了一个接口的请求封装。
1 2 3 4 5 6 7 8 9 10 11 12 13 14 15 16 17 18 19 20 21 22 23 24 25 26 27 28 29 30 31 32 33 34 35 36 37 38 39 40 41 42 43 44 45 * 这是一个请求方法 * @param {string} method 请求方式 * @param {string} url 请求连接 * @param {object} params 请求参数 * @return {Promise} 返回 Promise */ function reqMethod (method, url, obj, config = {} ) if (method.toLocaleLowerCase() === 'jsonp' ) { let q = Object .assign({}, obj, { '_' : new Date ().getTime() }); return new Promise ((resolve, reject) => { let path = url + '?' + qs.stringify(q); jsonp(path, { timeout: axios.defaults.timeout }, function (err, data ) if (err) { MsgToast('err' ); reject(err); } MsgToast({ data, requestURL: path }); if (data.returncode !== undefined && data.returncode !== 0 ) { console .warn('JSONP 响应拦截器拦截 状态码异常:' , data); return Promise .reject(new Error ('状态码异常' )); } resolve(data); }); }); } let modeKey = ['post' , 'put' ].includes(method.toLowerCase()) ? 'data' : 'params' ; return new Promise ((resolve, reject) => { axios({ method: method.toLowerCase(), url: url, [modeKey]: obj || {}, ...config }).then((response) => { resolve(response.data, url); }).catch((error) => { reject(error); }); }); }
总结: 在 vue-cli 3.0 的构建环境下很容将一个组件输出为一个UMD的库,通过不同的引入方式可以支持在传统业务和 vue项目中引入,这符合vue的一贯思路 The Progressive
JavaScript Framework,行动起来吧,是时候选择用 vue 完成你的开发任务了。
拓展阅读: 如何在 npm 上发布你的 vue 组件
Vue-CLI 3.0 构建目标
评论系统源码